Setting up Single Node Clickhouse on AWS EC2 and S3 for Backup
clickhouse
Table of Contents
- Is a single node enough?
- Choice of hardware
- Create an instance
- Server configuration
- Automated backups
- Monitor the backup cron job
- Set up a healthcheck for ClickHouse
- Monitor server resources
ClickHouse is a fast and reliable columnar database. It's open source, scales linearly, and can be deployed either as a single instance or as a cluster.
In this guide I'll show you how to deploy ClickHouse including automated backups and basic monitoring. I'll be using AWS, but most steps apply to other cloud providers, so feel free to use your preferred platform.
Is a single node enough?
One crucial decision in deploying ClickHouse is whether to use a single instance or set up a cluster, each with its own advantages and drawbacks.
In certain scenarios, a cluster configuration may not be necessary. ClickHouse has the capability to handle a substantial volume of records on a solo server, as demonstrated by its ability to process billions of records on a single server, as seen in this example. Opting for a single-instance setup is simpler and cost-effective, making it an appealing choice for various use cases.
At both Palzin Monitor and Palzin Track, we utilize a single-node ClickHouse configuration. Palzin Track relies on it for all analytics from its early stages, while at Palzin Monitor, the data ingestion has been steadily increasing into the tens of billions of records annually. This growth has prompted us to consider migrating from the existing MySQL setup to ClickHouse. Additionally, we are launching a new performance monitoring product that will also leverage ClickHouse.
Our instances operate on plain AWS EC2 and Kubernetes. While the Kubernetes setup provides flexibility, it demands a solid understanding of production operations, particularly when dealing with stateful services like ClickHouse.
Managed solutions alleviate operational complexities but may not always be viable based on specific requirements or budget constraints. This limitation could pose a challenge for those seeking to use ClickHouse for their projects.
However, running ClickHouse in production doesn't necessarily require an intricate cluster setup or a substantial budget. A single instance can be quite effective. Consequently, this guide will focus on the single-instance setup for simplicity and accessibility.
Choice of hardware
The ClickHouse team provides recommendations regarding hardware choices, which can be summarized as follows:
- It is advisable to prioritize a higher number of cores over fewer cores with a higher clock rate. ClickHouse can effectively distribute workloads in parallel, utilizing all available cores.
- ClickHouse supports different CPU architectures, but x86_64 and AArch64 are the most common in deployments. AArch64 might offer performance improvements in some specific scenarios.
- A minimum of 4GB of RAM is recommended, but generally, more RAM is better. Consider the amount of memory available for each core.
- SSD volumes are preferred for storage, although HDDs are acceptable. It's suggested to explore mounting multiple disks for increased throughput or better economics.
- Aim for a network bandwidth of 10G or higher.
The cost and performance implications depend on the specific configuration and workload. Factors such as the chosen instance family, EBS volume and provisioned IOPS configurations, and the use of swap files can significantly impact performance.
In terms of capacity planning, scaling vertically or horizontally in a live production environment can be challenging. If budget permits, it's advisable to allocate additional capacity on the server to accommodate unexpected loads.
For a detailed performance comparison of various configurations, the ClickBench tool is recommended, and further information can be found here.
Create an instance
Let's start by creating an instance on AWS (or your preferred cloud provider). For this example, I'll pick the following settings:
- Instance type:
t2.large. - OS: Ubuntu Server 22.04 LTS (x86_64).
- Storage: 1TB SSD (gp3)
I chose EBS volumes with gp3 as they're faster and cheaper than gp2. Also, you can optionally split the disk into multiple volumes as this can increase throughput, or have better costs if you tier your storage (eg. automatically move data older than 3 months into slower disks).
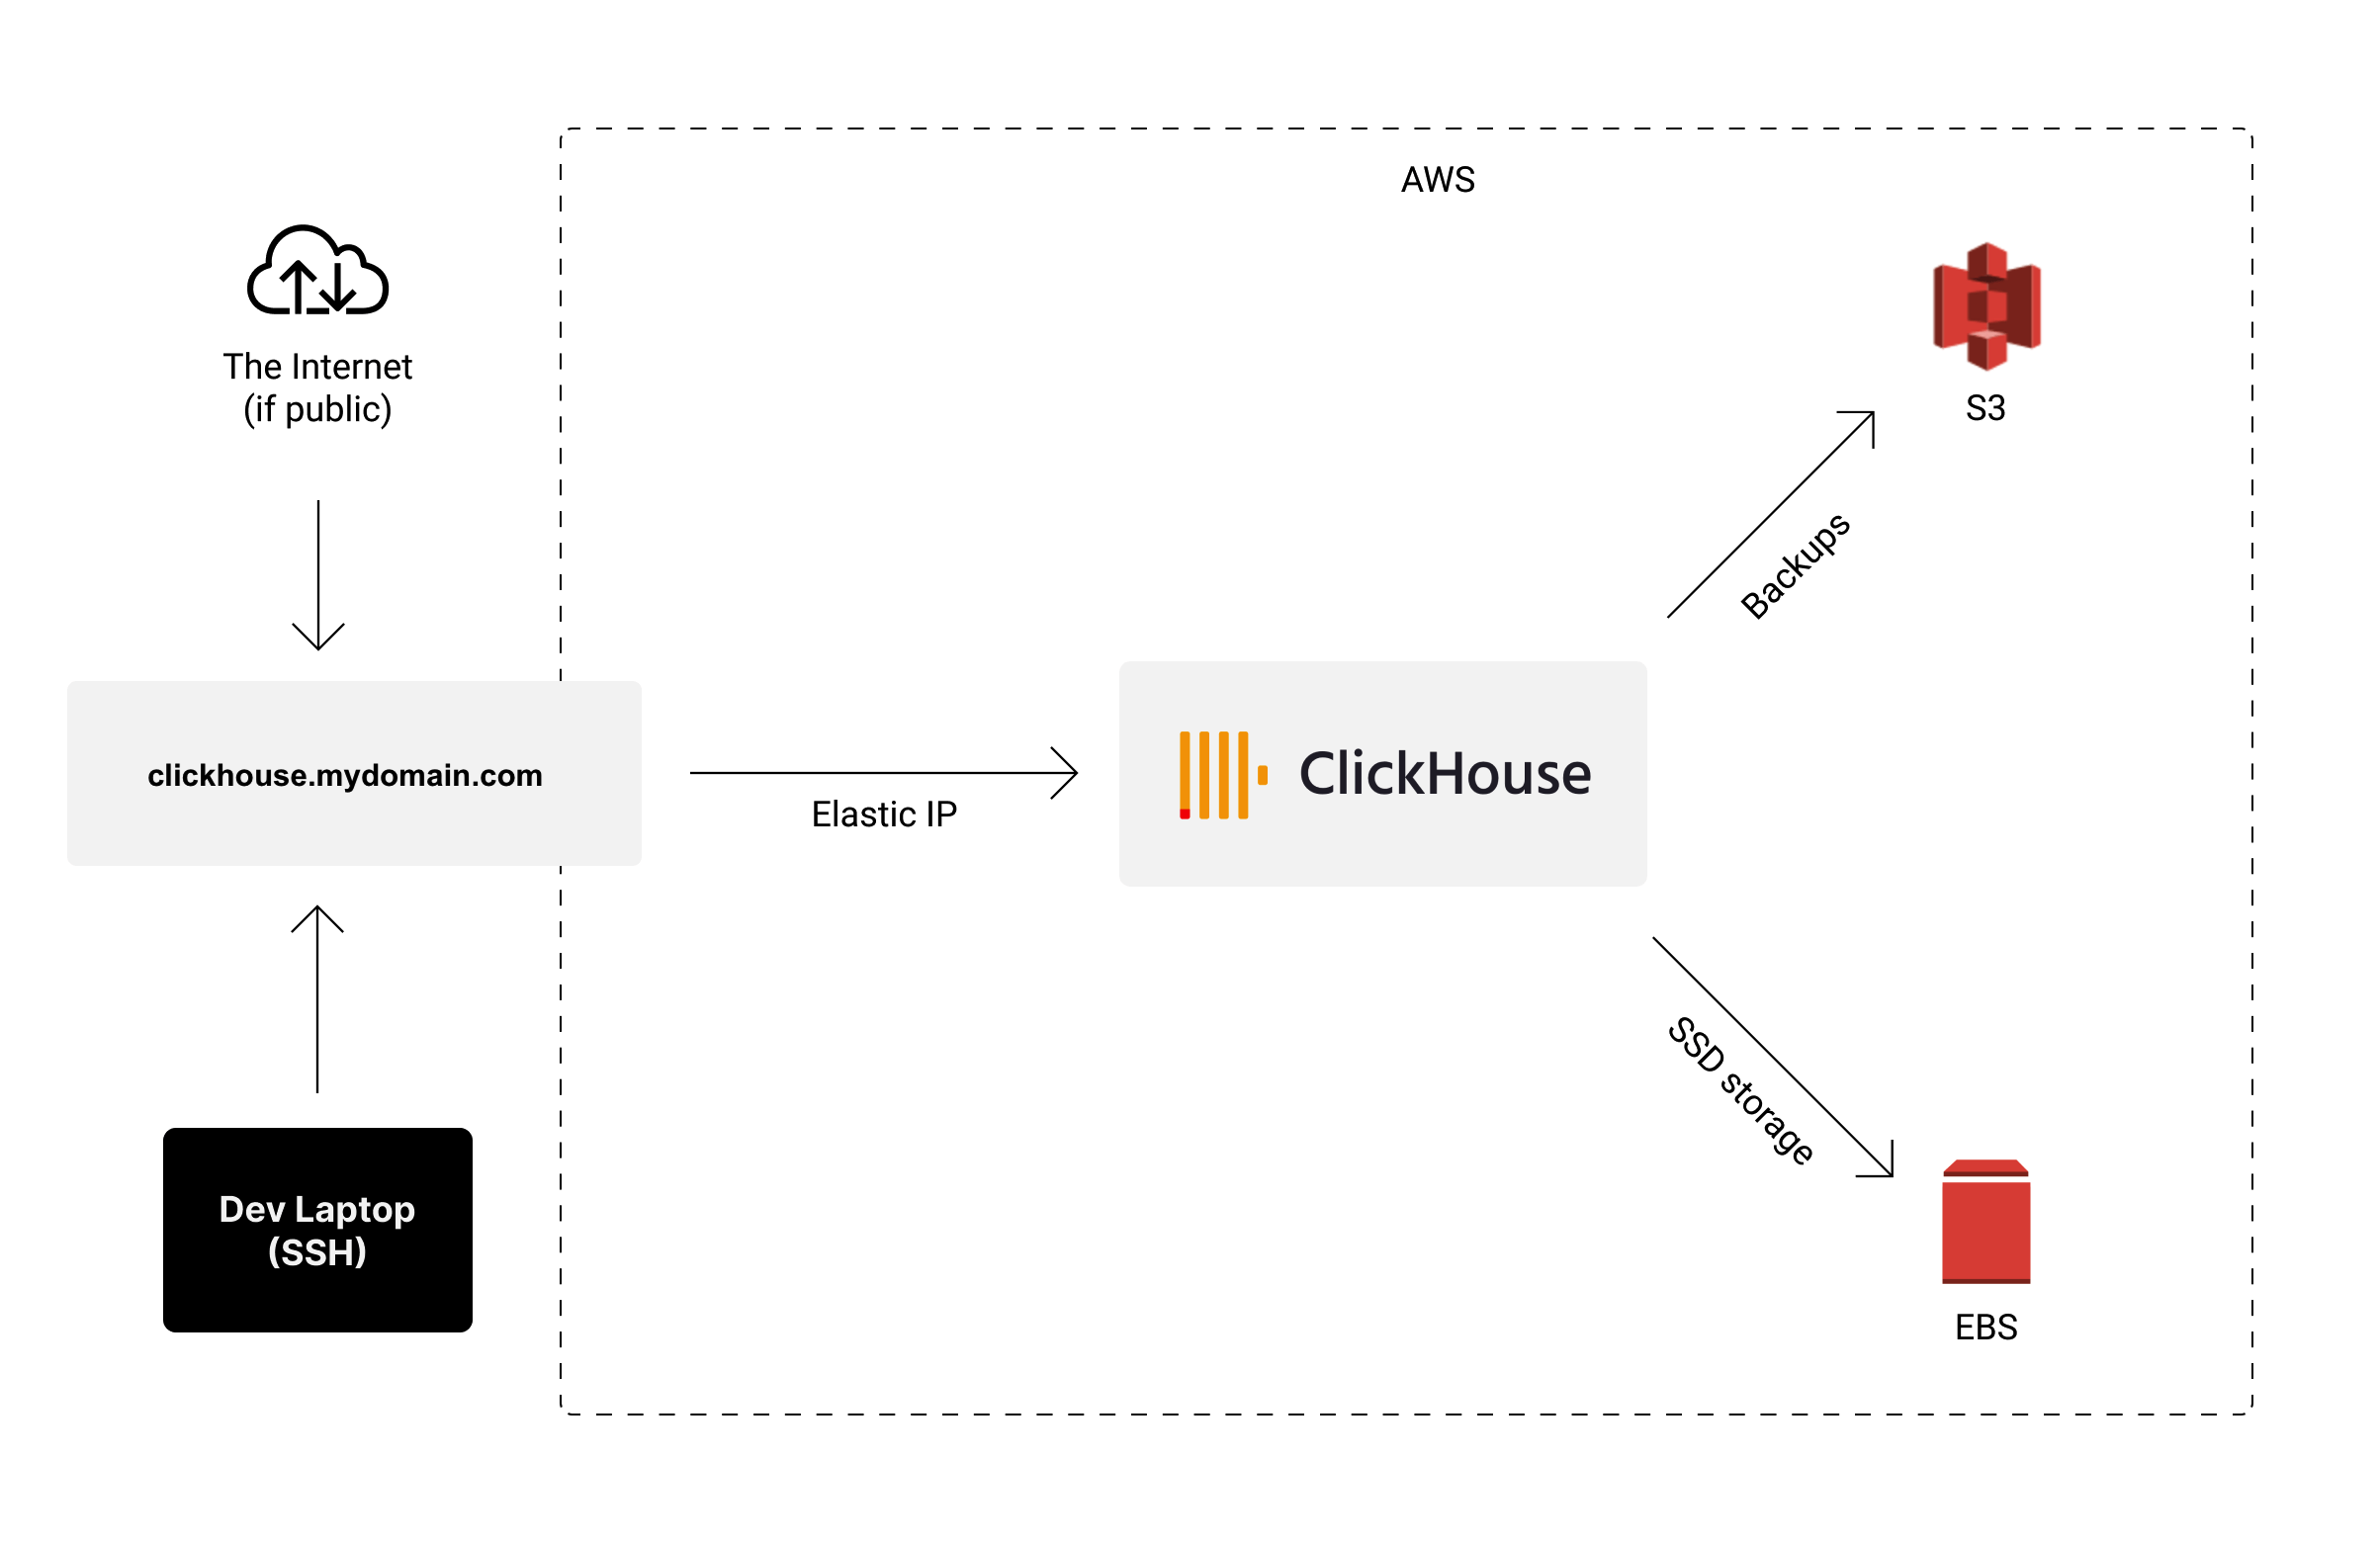
In terms of networking, you can configure the instance to be public, protected by security groups so only you and your apps can access it. Alternatively, you can set up a private network and SSH into the instance via a bastion host - up to you.
I attached an elastic IP to my instance and created a DNS record for it (eg. clickhouse.acme.com). That way, even if I migrate ClickHouse to another instance, all my tools and apps won't need to change their configuration if I change the database setup.
Server configuration
Let's SSH into the instance to configure it and install ClickHouse.
The ClickHouse team has come up with a few operational recommendations here. I'm using that as reference for this section.
The first thing we'll do is update our packages:
sudo apt-get update -y
Mount the EBS volume
Next, we'll need to mount the EBS volume. You can check existing block devices with the following command:
$ lsblk

NAME         MAJ:MIN RM  SIZE RO TYPE MOUNTPOINTS
loop0          7:0    0 25.1M  1 loop /snap/amazon-ssm-agent/5656
loop1          7:1    0 55.5M  1 loop /snap/core18/2409
loop2          7:2    0 61.9M  1 loop /snap/core20/1518
loop3          7:3    0 79.9M  1 loop /snap/lxd/22923
loop4          7:4    0   47M  1 loop /snap/snapd/16010
nvme0n1      259:0    0  100G  0 disk
├─nvme0n1p1  259:1    0 99.9G  0 part /
├─nvme0n1p14 259:2    0    4M  0 part
└─nvme0n1p15 259:3    0  106M  0 part /boot/efi
nvme1n1      259:4    0 1000G  0 disk
You can see that our EBS disk (nvme1n1) is there, but it hasn't been mounted yet. Let's fix that.
First, we'll create a ext4 filesystem on the device, and mount it at /var/lib/clickhouse which is where all the ClickHouse data will be stored.
sudo mkfs -t ext4 /dev/nvme1n1
sudo mkdir /var/lib/clickhouse
sudo mount /dev/nvme1n1 /var/lib/clickhouse
Next, we'll register the volume in /etc/fstab so the volume is automatically mounted after instance restarts.
sudo vi /etc/fstab
Append the entry below:
/dev/nvme1n1 /var/lib/clickhouse ext4 rw,noatime 0 2
The noatime option disables writing file access times every time a file is read. This can improve performance for programs that access the filesystem frequently (such as databases), and has virtually no impact on your applications.
You should now be able to see the mounted device:
$ lsblk

NAME         MAJ:MIN RM  SIZE RO TYPE MOUNTPOINTS
loop0          7:0    0 25.1M  1 loop /snap/amazon-ssm-agent/5656
loop1          7:1    0 55.5M  1 loop /snap/core18/2409
loop2          7:2    0 61.9M  1 loop /snap/core20/1518
loop3          7:3    0 79.9M  1 loop /snap/lxd/22923
loop4          7:4    0   47M  1 loop /snap/snapd/16010
nvme0n1      259:0    0  100G  0 disk
├─nvme0n1p1  259:1    0 99.9G  0 part /
├─nvme0n1p14 259:2    0    4M  0 part
└─nvme0n1p15 259:3    0  106M  0 part /boot/efi
nvme1n1      259:4    0 1000G  0 disk /var/lib/clickhouse
You can also check the filesystem for ClickHouse:
$ df -h

Filesystem       Size  Used Avail Use% Mounted on
/dev/root         97G  2.6G   95G   3% /
tmpfs             31G     0   31G   0% /dev/shm
tmpfs             13G  892K   13G   1% /run
tmpfs            5.0M     0  5.0M   0% /run/lock
/dev/nvme0n1p15  105M  5.3M  100M   5% /boot/efi
tmpfs            6.2G  4.0K  6.2G   1% /run/user/1000
/dev/nvme1n1     984G   28K  934G   1% /var/lib/clickhouse
Increase the nofile limit
We'll also increase the open file descriptors limit. This is important because ClickHouse might open a large number of files during operation.
You could use the command ulimit -n 262144, but this would not persist changes after instance restarts. Instead, we'll edit the file in /etc/security/limits.conf:
$ sudo vi /etc/security/limits.conf

###  Append the following entries:
* hard nofile 262144
* soft nofile 262144
Reduce or disable swap files
Clickhouse doesn't like swap files as they can slow down performance when they kick in. We could disable them entirely, but it can lead to service disruptions in case the system needs more memory than what is available.
Instead, we'll hint to the OS to not rely on swap files unless absolutely necessary. Open the /etc/sysctl.conf file and adjust the VM swapiness setting:
$ sudo vi /etc/sysctl.conf

### Append entry below
vm.swappiness=1
By default, vm.swappiness will be a value of 60. Which means the percentage of available memory before the OS uses of swap files. A value of 1 means that the OS will only rely on swap files once it's close to running out of memory.
Install ClickHouse
The installation instructions depend on which OS and package manager you're using. I'm using Ubuntu and apt-get, but you can lookup which instructions apply to you here.
sudo apt-get install -y apt-transport-https ca-certificates dirmngr
sudo apt-key adv --keyserver hkp://keyserver.ubuntu.com:80 --recv 8919F6BD2B48D754

echo "deb https://packages.clickhouse.com/deb stable main" | sudo tee \
    /etc/apt/sources.list.d/clickhouse.list
sudo apt-get update

sudo apt-get install -y clickhouse-server clickhouse-client
During the installation, ClickHouse might ask you for the default user password. It's a good idea to set one right away.
Change the ClickHouse password
You can also change the default password. To do so, perform a SHA256 of your desired password:
echo -n 'supersecret' | sha256sum | tr -d '-'
Create the password config file at the following location:
sudo vi /etc/clickhouse-server/users.d/default-password.xml
And add the following XML config. Don't forget to replace SUPER_SECRET_HASH with the hash of your desired password:
<clickhouse>
    <users>
        <default>
            <password remove='1' />
            <password_sha256_hex>SUPER_SECRET_HASH</password_sha256_hex>
        </default>
    </users>
</clickhouse>
Start ClickHouse on system boot
Let's reload the systemd daemon so it picks up the new service:
sudo systemctl daemon-reload
Next, let's enable the service, that way it'd be automatically started if the instance reboots:
sudo systemctl enable clickhouse-server
Finally, restart your instance. That way we can verify that our configuration persists and ClickHouse is automatically started by systemd.
Once you've done so, you can make sure that ClickHouse is up and running with the following command:
$ sudo systemctl status clickhouse-server

● clickhouse-server.service - ClickHouse Server (analytic DBMS for big data)
     Loaded: loaded (/lib/systemd/system/clickhouse-server.service; enabled; vendor preset: enabled)
     Active: active (running) since Fri 2022-08-19 09:56:55 UTC; 59s ago
   Main PID: 771 (clckhouse-watch)
      Tasks: 206 (limit: 75930)
     Memory: 562.6M
        CPU: 684ms
     CGroup: /system.slice/clickhouse-server.service
             ├─776 clickhouse-watchdog --config=/etc/clickhouse-server/config.xml --pid-file=/run/clickhouse-server/clickhouse-server.pid
             └─842 /usr/bin/clickhouse-server --config=/etc/clickhouse-server/config.xml --pid-file=/run/clickhouse-server/clickhouse-server.pid
You can also check that our nofile limits are still set:
$ ulimit -n

262144
Let's also ensure that our ClickHouse volume has been mounted after restart:
$ df -h

Filesystem       Size  Used Avail Use% Mounted on
/dev/root         97G  2.6G   95G   3% /
tmpfs             31G     0   31G   0% /dev/shm
tmpfs             13G  892K   13G   1% /run
tmpfs            5.0M     0  5.0M   0% /run/lock
/dev/nvme0n1p15  105M  5.3M  100M   5% /boot/efi
/dev/nvme1n1     984G  2.9M  934G   1% /var/lib/clickhouse
tmpfs            6.2G  4.0K  6.2G   1% /run/user/1000
Automated backups
At this point our ClickHouse instance is ready to be used. But if we're running it for production workloads, it's important to have some backups and a way to restore them in case of an emergency.
Luckily, there's a great backup tool for ClickHouse called clickhouse-backup. It makes it quite easy to upload and restore backups from object storage in AWS, GCS, Azure. You can also store backups in secondary disks or other forms of remote storage.
Clickhouse backup also has useful features like backing up only specific tables, or doing incremental backups to remote storages. This can be more efficient for very large tables.
Let's set up backups for our instance:
### Download and decompress the binary (not this is the x86_64 version, for AArch64 see releases on GitHub).
curl -LO https://github.com/AlexAkulov/clickhouse-backup/releases/download/v1.5.2/clickhouse-backup-linux-amd64.tar.gz
tar -zxvf clickhouse-backup-linux-amd64.tar.gz

### Move it to /usr/bin and make it executable
sudo mv build/linux/amd64/clickhouse-backup /usr/bin/
sudo chmod +x /usr/bin/clickhouse-backup
Check that it's been correctly installed by running the following command:
sudo clickhouse-backup
I'll be storing my backups in S3, so I created a bucket called my-clickhouse-backups. If you also want to backup to S3, go ahead and create your desired bucket now.
Once you've done that, we'll configure clickhouse-backup so it can connect to ClickHouse and upload the backups to our bucket.
First, create the config file:
sudo mkdir -p /etc/clickhouse-backup/
sudo vi /etc/clickhouse-backup/config.yml
When the editor opens, create the following file for S3 backups.
general:
  remote_storage: s3             ### REMOTE_STORAGE, if `none` then `upload` and  `download` command will fail
  max_file_size: 1073741824      ### MAX_FILE_SIZE, 1G by default, useless when upload_by_part is true, use for split data parts files by archives
  disable_progress_bar: true     ### DISABLE_PROGRESS_BAR, show progress bar during upload and download, have sense only when `upload_concurrency` and `download_concurrency` equal 1
  backups_to_keep_local: 1       ### BACKUPS_TO_KEEP_LOCAL, how much newest local backup should keep, 0 mean all created backups will keep on local disk
                                 ### you shall to run `clickhouse-backup delete local <backup_name>` command to avoid useless disk space allocations
  backups_to_keep_remote: 30      ### BACKUPS_TO_KEEP_REMOTE, how much newest backup should keep on remote storage, 0 mean all uploaded backups will keep on remote storage.
                                 ### if old backup is required for newer incremental backup, then it will don't delete. Be careful with long incremental backup sequences.
  log_level: info                ### LOG_LEVEL
  allow_empty_backups: false     ### ALLOW_EMPTY_BACKUPS
  download_concurrency: 1        ### DOWNLOAD_CONCURRENCY, max 255
  upload_concurrency: 1          ### UPLOAD_CONCURRENCY, max 255
  restore_schema_on_cluster: ""  ### RESTORE_SCHEMA_ON_CLUSTER, execute all schema related SQL queryes with `ON CLUSTER` clause as Distributed DDL, look to `system.clusters` table for proper cluster name
  upload_by_part: true           ### UPLOAD_BY_PART
  download_by_part: true         ### DOWNLOAD_BY_PART
clickhouse:
  username: default                ### CLICKHOUSE_USERNAME
  password: "SUPER_SECRET"         ### CLICKHOUSE_PASSWORD
  host: localhost                  ### CLICKHOUSE_HOST
  port: 9000                       ### CLICKHOUSE_PORT, don't use 8123, clickhouse-backup doesn't support HTTP protocol
  disk_mapping: {}                 ### CLICKHOUSE_DISK_MAPPING, use it if your system.disks on restored servers not the same with system.disks on server where backup was created
  skip_tables:                     ### CLICKHOUSE_SKIP_TABLES
    - system.*
    - INFORMATION_SCHEMA.*
    - information_schema.*
  timeout: 5m                  ### CLICKHOUSE_TIMEOUT
  freeze_by_part: false        ### CLICKHOUSE_FREEZE_BY_PART, allows freeze part by part instead of freeze the whole table
  freeze_by_part_where: ""     ### CLICKHOUSE_FREEZE_BY_PART_WHERE, allows parts filtering during freeze when freeze_by_part: true
  secure: false                ### CLICKHOUSE_SECURE, use SSL encryption for connect
  skip_verify: false           ### CLICKHOUSE_SKIP_VERIFY
  sync_replicated_tables: true ### CLICKHOUSE_SYNC_REPLICATED_TABLES
  tls_key: ""                  ### CLICKHOUSE_TLS_KEY, filename with TLS key file
  tls_cert: ""                 ### CLICKHOUSE_TLS_CERT, filename with TLS certificate file
  tls_ca: ""                   ### CLICKHOUSE_TLS_CA, filename with TLS custom authority file
  log_sql_queries: false        ### CLICKHOUSE_LOG_SQL_QUERIES, enable log clickhouse-backup SQL queries on `system.query_log` table inside clickhouse-server
  debug: false                 ### CLICKHOUSE_DEBUG
  config_dir:      "/etc/clickhouse-server"              ### CLICKHOUSE_CONFIG_DIR
  restart_command: "systemctl restart clickhouse-server" ### CLICKHOUSE_RESTART_COMMAND, this command use when you try to restore with --rbac or --config options
  ignore_not_exists_error_during_freeze: true ### CLICKHOUSE_IGNORE_NOT_EXISTS_ERROR_DURING_FREEZE, allow avoiding backup failures when you often CREATE / DROP tables and databases during backup creation, clickhouse-backup will ignore `code: 60` and `code: 81` errors during execute `ALTER TABLE ... FREEZE`
  check_replicas_before_attach: true ### CLICKHOUSE_CHECK_REPLICAS_BEFORE_ATTACH, allow to avoid concurrent ATTACH PART execution when restore ReplicatedMergeTree tables
s3:
  access_key: ""                   ### S3_ACCESS_KEY
  secret_key: ""                   ### S3_SECRET_KEY
  bucket: "my-clickhouse-backups"  ### S3_BUCKET
  endpoint: ""                     ### S3_ENDPOINT
  region: eu-central-1             ### S3_REGION
  acl: private                     ### S3_ACL
  assume_role_arn: ""              ### S3_ASSUME_ROLE_ARN
  force_path_style: false          ### S3_FORCE_PATH_STYLE
  path: ""                         ### S3_PATH
  disable_ssl: false               ### S3_DISABLE_SSL
  compression_level: 1             ### S3_COMPRESSION_LEVEL
  compression_format: tar          ### S3_COMPRESSION_FORMAT
  sse: ""                          ### S3_SSE, empty (default), AES256, or aws:kms
  disable_cert_verification: false ### S3_DISABLE_CERT_VERIFICATION
  use_custom_storage_class: false  ### S3_USE_CUSTOM_STORAGE_CLASS
  storage_class: STANDARD          ### S3_STORAGE_CLASS
  concurrency: 1                   ### S3_CONCURRENCY
  part_size: 0                     ### S3_PART_SIZE, if less or eq 0 then calculated as max_file_size / max_parts_count, between 5MB and 5Gb
  max_parts_count: 10000           ### S3_MAX_PARTS_COUNT, number of parts for S3 multipart uploads
  allow_multipart_download: false  ### S3_ALLOW_MULTIPART_DOWNLOAD, allow us fast download speed (same as upload), but will require additional disk space, download_concurrency * part size in worst case
  debug: false                     ### S3_DEBUG
Don't forget to replace:
-
clickhouse.password: "SUPER_SECRET"with your password. -
s3.bucket: "my-clickhouse-backups"with your S3 bucket name. -
s3.region: "eu-central-1"with the correct AWS region for your bucket.
There's plenty more settings you can configure, and remote storages other than S3. Feel free to check all configuration options here.
We'll need to grant S3 access to our instance for this to work. So create a new AWS IAM Role with the following policy (don't forget to replace my-clickhouse-backups with your bucket):
{
    "Version": "2012-10-17",
    "Statement": [
        {
            "Sid": "AccessS3BackupFiles",
            "Effect": "Allow",
            "Action": [
                "s3:PutObject",
                "s3:GetObject"
            ],
            "Resource": "arn:aws:s3:::my-clickhouse-backups/*"
        },
        {
            "Sid": "AccessS3BackupBucket",
            "Effect": "Allow",
            "Action": "s3:ListBucket",
            "Resource": "arn:aws:s3:::my-clickhouse-backups"
        }
    ]
}
Now attach that role to your instance. You can do so from the AWS console by selecting your instance and going to Actions > Security > Modify IAM role. You don't need to restart it for these changes to take effect.
Next let's create a cron job so our backups run every day.
Create the cron job script:
sudo mkdir -p /opt/scripts/
sudo vi /opt/scripts/clickhouse-backup.sh
Place the following contents inside the script file:
#!/bin/bash
set -e

BACKUP_NAME=clickhouse-backup_$(date -u +%Y-%m-%dT%H-%M-%S)

clickhouse-backup create $BACKUP_NAME
clickhouse-backup upload $BACKUP_NAME
And make it executable:
sudo chmod +x /opt/scripts/clickhouse-backup.sh
Finally, let's register our backup job in crontab. To do so, open your root crontab in editing mode:
sudo crontab -e
And append the following entry:
0 0 * * * /opt/scripts/clickhouse-backup.sh
And we're done - our cron job should run every day at midnight UTC.
Monitor the backup cron job
Picture this: one day you get alerted that your ClickHouse server is down. You take a look and realize the data became corrupted. "It's all under control" - you think. After all, you were creating daily backups to prepare for this day.
So you try to restore the most recent backup. But then you realize the latest backup is older than 3 months. What happened? Turns out, the cron job responsible for making the backups stopped running a while ago. Nobody realized until today.
Well, that's an unfortunate surprise. The latest data we can restore is from 3 months ago and there were plenty changes since then.
That's why we want to make sure the backup job is always up and running, and get notified when it's failing.
To monitor our cron job, we'll be using Palzin Monitor. That way our team can get notified via SMS, Slack and email when the job stops running. It also gives us useful error logs and performance metrics. That makes it easier to troubleshoot why our job stopped working without having to SSH and inspect logs on the server.
Let's execute a backup right now to make sure it's all working.
Let's create a table with some data, so the job has something to back up.
Connect to your ClickHouse instance:
clickhouse client --password
Create a demo table and insert some data:
CREATE DATABASE IF NOT EXISTS demo;

CREATE TABLE demo.example_table
(
    user_id UInt32,
    message String,
    timestamp DateTime,
    response_time Float32
)
ENGINE = MergeTree()
PRIMARY KEY (user_id, timestamp);


INSERT INTO demo.example_table (user_id, message, timestamp, response_time) VALUES
    (1, 'Hello, world', now(), 5.5),
    (2, 'This is a message', yesterday(), 4.27),
    (1, 'Gotta go fast', now() - 7, 7.29),
    (4, 'Metric from another user_id', today(), -14.432);
Now try to run the backup job again:
sudo /opt/scripts/clickhouse-backup.sh
And you can see the backup has been stored in S3 too.
$ sudo clickhouse-backup list

clickhouse-backup_2022-08-19T13-39-17    1.16KiB   19/08/2022 13:39:17   local
clickhouse-backup_2022-08-19T13-39-17    8.54KiB   19/08/2022 13:39:18   remote
To restore backups, all we need to do is:
$ sudo clickhouse-backup restore <name-of-backup>
Next, let's add a healthcheck to monitor the Clickhouse process itself.
Set up a healthcheck for ClickHouse
While systemd will automatically restart ClickHouse whenever it goes down, sometimes the process might become unhealthy or might be unable to start properly. We want to get notified when that happens, so we'll also add a healthcheck for this using Palzin Monitor.
Simply create a new healthcheck script:
sudo touch /opt/scripts/clickhouse-healthcheck.sh
sudo chmod +x /opt/scripts/clickhouse-healthcheck.sh
sudo vi /opt/scripts/clickhouse-healthcheck.sh
And place the following contents:
#!/bin/bash
set -e

### Ping the ClickHouse HTTP server, fail if not 2xx
curl -v --fail http://localhost:8123/
Register the job in crontab:
$ sudo crontab -e

### Append new entry, runs every minute
* * * * * /opt/scripts/clickhouse-healthcheck.sh
You should soon see the healthcheck job in your Palzin dashboard.
Monitor server resources
Finally, we want to monitor the CPU and memory usage of the instance, and how much space is still available on the disk as our dataset grows. That way I can set up alerts to get notified whenever I should consider re-resizing either the instance or the disk.
This step highly depends on which platform and OS you're using. Some cloud providers may already provide you these metrics out of the box, while others might need a separate installation.
I'm using EC2, so I installed the AWS CloudWatch agent. Feel free to check if your cloud provider already exposes these metrics for you, or use your favorite infrastructure monitoring provider.
In general, it's a good idea to create alerts for the following metrics:
- Avg. CPU usage > 80% over last 15 minutes
- Avg. Memory usage > 80% over last 5 minutes
- Used disk space > 50%
Or whatever you consider appropriate for your use case.
Many of these considerations apply to clustered and managed deployments too, so I hope this guide was useful to you and helps you decide how to go about your ClickHouse deployment.
Comments (0)
What are your thoughts on "Setting up Single Node Clickhouse on AWS EC2 and S3 for Backup"?
You need to create an account to comment on this post.
Related articles