
How to Export Logs from Apache2 Web Server to Amazon CloudWatch
aws
Table of Contents
- What will you do
- Requirements
- Install and configure an Amazon EC2 instance
- Setup Log Format on Apache2 Configuration File
- Installing AWS CloudWatch Agent
- Perform queries on CloudWatch Logs Insights
- Common Investigation Query using Log Insight
- Uninstall AWS CloudWatch Agent
In this tutorial, you will learn how to export logs from your Apache2 Web Server to Amazon CloudWatch logs and analyze with log insights.
Amazon CloudWatch Logs Insights enables you to interactively search and analyze your log data in Amazon CloudWatch Logs. CloudWatch Logs Insights automatically discovers log fields for any logs stored in JSON format. This simplifies tasks like analyzing webpage traffic, searching for traces of DDoS attacks, or querying the number of unique users visit your application daily.
What will you do
- Install and configure an Amazon EC2 instance
- Setup Log format on Apache2 Configuration file
- Installing AWS CloudWatch Agent
- Perform queries on CloudWatch Logs Insights
- Common Investigation Query using Log Insight
- Uninstall AWS CloudWatch Agent
Requirements
- Create an AWS Account.
- An Amazon EC2 instance with Ubuntu 18.04 Server.
- Need to have a Apache2 Web Server.
- A user with sudo privilege command.
To get started, This guide will show you on how to export logs from your Apache2 Web Server to Amazon CloudWatch.
Install and configure an Amazon EC2 instance
Sign in to AWS Management Console and open AWS IAM console at https://console.aws.amazon.com/iam/home.
Create a new AWS IAM user.
Use custom IAM policy document below to ensure you EC2 instance can transmit logs to Amazon CloudWatch logs.
    {
        "Version": "2012-10-17",
        "Statement": [
            {
                "Sid": "VisualEditor0",
                "Effect": "Allow",
                "Action": [
                    "cloudwatch:PutMetricData",
                    "cloudwatch:GetMetricStatistics",
                    "cloudwatch:ListMetrics",
                    "ec2:DescribeTags"
                ],
                "Resource": "*"
            }
        ]
    }
After creating an AWS IAM user, keep your AWS Access Key ID and AWS Secret Access Key file.
Open terminal on your system and SSH remote into your [EC2 Ubuntu 18.04 server] using:
ssh -i EC2key.pem ubuntu@EC2-Public-IPCopy
Update your Ubuntu system repository type:
sudo apt-get updateCopy
Setup Log Format on Apache2 Configuration File
Firstly, you need to configure the Apache2 logs format at /etc/apache2/apache2.conf.
Open the file using:
sudo vim /etc/apache2/apache2.confCopy
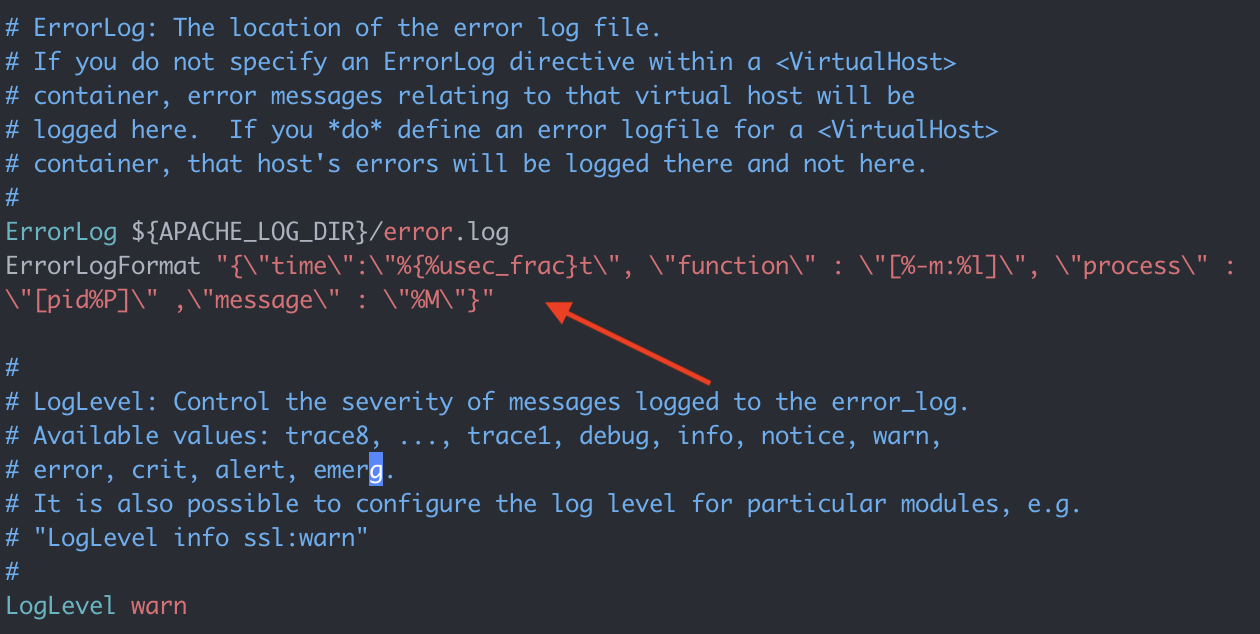
In line 134 find name ErrorLog and add the following Error log format below:
ErrorLogFormat "{\\"time\\":\\"%{%usec\_frac}t\\", \\"function\\" : \\"\[%-m:%l\]\\", \\"process\\" : \\"\[pid%P\]\\" ,\\"message\\" : \\"%M\\"}"Copy
Output:
Next, find name Logformat and add the following Access log format below:
LogFormat "{ \\"time\\":\\"%{%Y-%m-%d}tT%{%T}t.%{msec\_frac}tZ\\", \\"process\\":\\"%D\\", \\"filename\\":\\"%f\\", \\"remoteIP\\":\\"%a\\", \\"host\\":\\"%V\\", \\"request\\":\\"%U\\", \\"query\\":\\"%q\\",\\"method\\":\\"%m\\", \\"status\\":\\"%>s\\", \\"userAgent\\":\\"%{User-agent}i\\",\\"referer\\":\\"%{Referer}i\\"}" cloudwatchCopy
Go to the Apache virtual host file, from custom log format replace the tag name into cloudwatch.
Example:
<VirtualHost>
    ServerAdmin admin@example.com
    ServerName example.com
    DocumentRoot /var/www/html
    ErrorLog ${APACHE\_LOG\_DIR}/error.log
    CustomLog ${APACHE\_LOG\_DIR}/access.log cloudwatch
</VirtualHost>Copy
Installing AWS CloudWatch Agent
To install and configure AWS logs agent on Ubuntu, download the CloudWatch agent file from S3 using the following command:
curl https://s3.amazonaws.com/aws-cloudwatch/downloads/latest/awslogs-agent-setup.py -OCopy
Make sure you have python installed on your Ubuntu system.
sudo apt install pythonCopy
To run the Cloudwatch agent file, type:
sudo python ./awslogs-agent-setup.py _\--region us-west-2_Copy
Note: Run the python file with sudo privileges command and specify your instance Region.
Output:
Step 1 of 5: Installing pip …libyaml-dev does not exist in system DONE
Step 2 of 5: Downloading the latest CloudWatch Logs agent bits … DONECopy
Now configure the EC2 instance to have privileges to access on Amazon CloudWatch service, provide your AWS IAM credentials on the following:
Step 3 of 5: Configuring AWS CLI …
AWS Access Key ID**:** XXX-XXX-XXX
AWS Secret Access Key: XXXX-XXXX-XXXX-XXXX
Default region name \[us-west-2\]:
Default output format \[None\]:Copy
Next, exporting your Apache2 access logs to Amazon CloudWatch Logs, provide the path location of your Apache2 logs file. Example: /var/log/apache2/access.log
Step 4 of 5: Configuring the CloudWatch Logs Agent …
Path of log file to upload \[/var/log/syslog\]: /var/log/apache2/access.log
Destination Log Group name \[/var/log/apache2/access.log\]:Copy
In the Log Stream name choose option by EC2 instance id.
Choose Log Stream name:
1\. Use EC2 instance id.
2. Use hostname.
3. Custom.
   Enter choice \[1\]: 1Copy
And choose your Log Event timestamp format as you want.
Choose Log Event timestamp format:
1\. %b %d %H:%M:%S (Dec 31 23:59:59)
2. %d/%b/%Y:%H:%M:%S (10/Oct/2000:13:55:36)
3. %Y-%m-%d %H:%M:%S (2008-09-08 11:52:54)
4. Custom
   Enter choice \[1\]: 1Copy
To upload the entire logs of your Apache2 logs file, choose option From start of file.
Choose initial position of upload:
1\. From start of file.
2. From end of file.
   Enter choice \[1\]: 1
   More log files to configure? \[Y\]: nCopy
Note: If you want to configure another logs file such as Apache2 error log, then choose “Yes“.
Step 5 of 5: Setting up agent as a daemon …DONECopy
Your configuration file successfully saved at: /var/awslogs/etc/awslogs.conf
You can use sudo service awslogs start|stop|status|restart to control the daemon.
To see diagnostic information for the CloudWatch Logs Agent, see:
sudo tail -f _/var/log/awslogs.log_Copy
You can rerun interactive setup using:
sudo python ./awslogs-agent-setup.py \--region us-west-2 --only-generate-configCopy
Perform queries on CloudWatch Logs Insights
After a few moments you can begin to accessing the new logs events at https://console.aws.amazon.com/cloudwatch/home?region=us-west-2#logsV2:log-groups
In the AWS Management Console, choose CloudWatch, Log Groups.
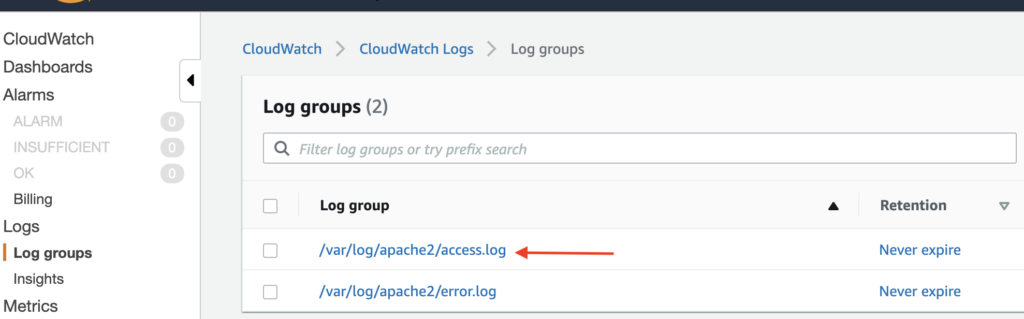
Inside each log group, you can find a log stream with a name of the InstanceID receiving your server logs.
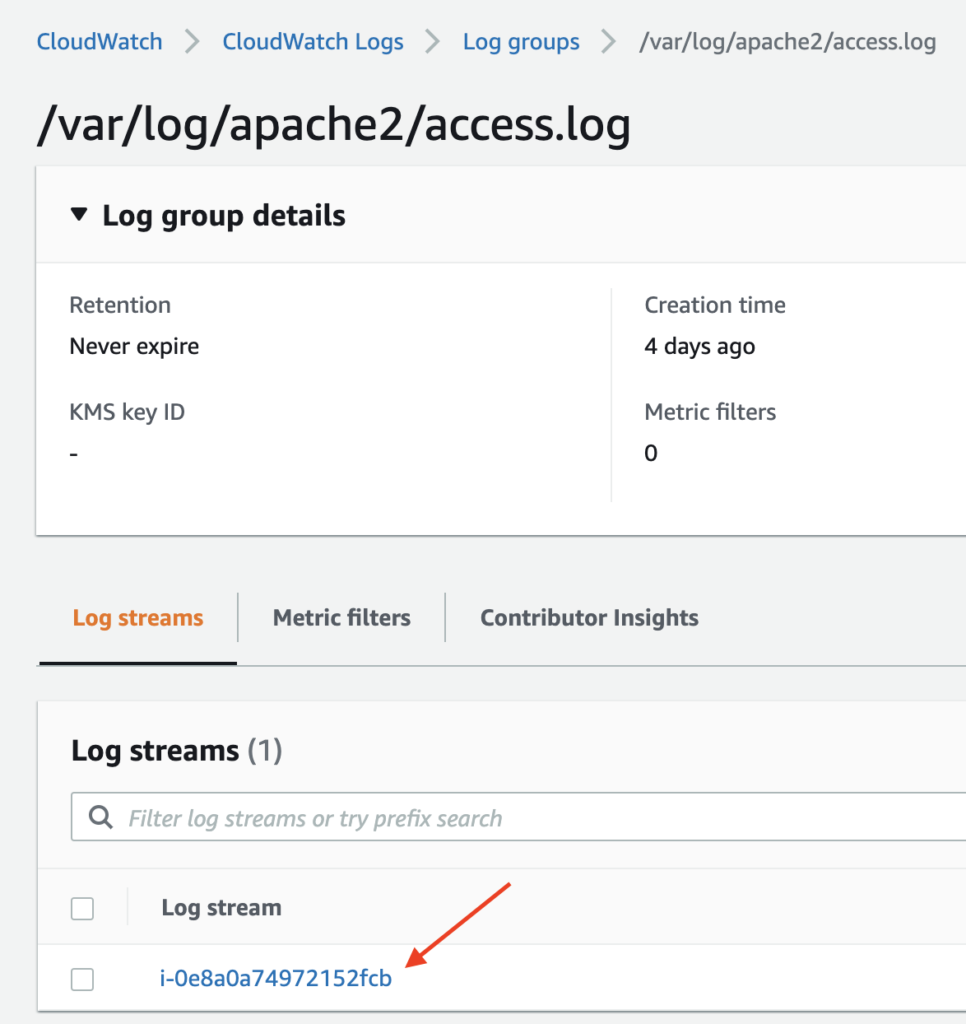
The log stream stores your server logs in a JSON format, that was the changes you made earlier to your Apache configuration.
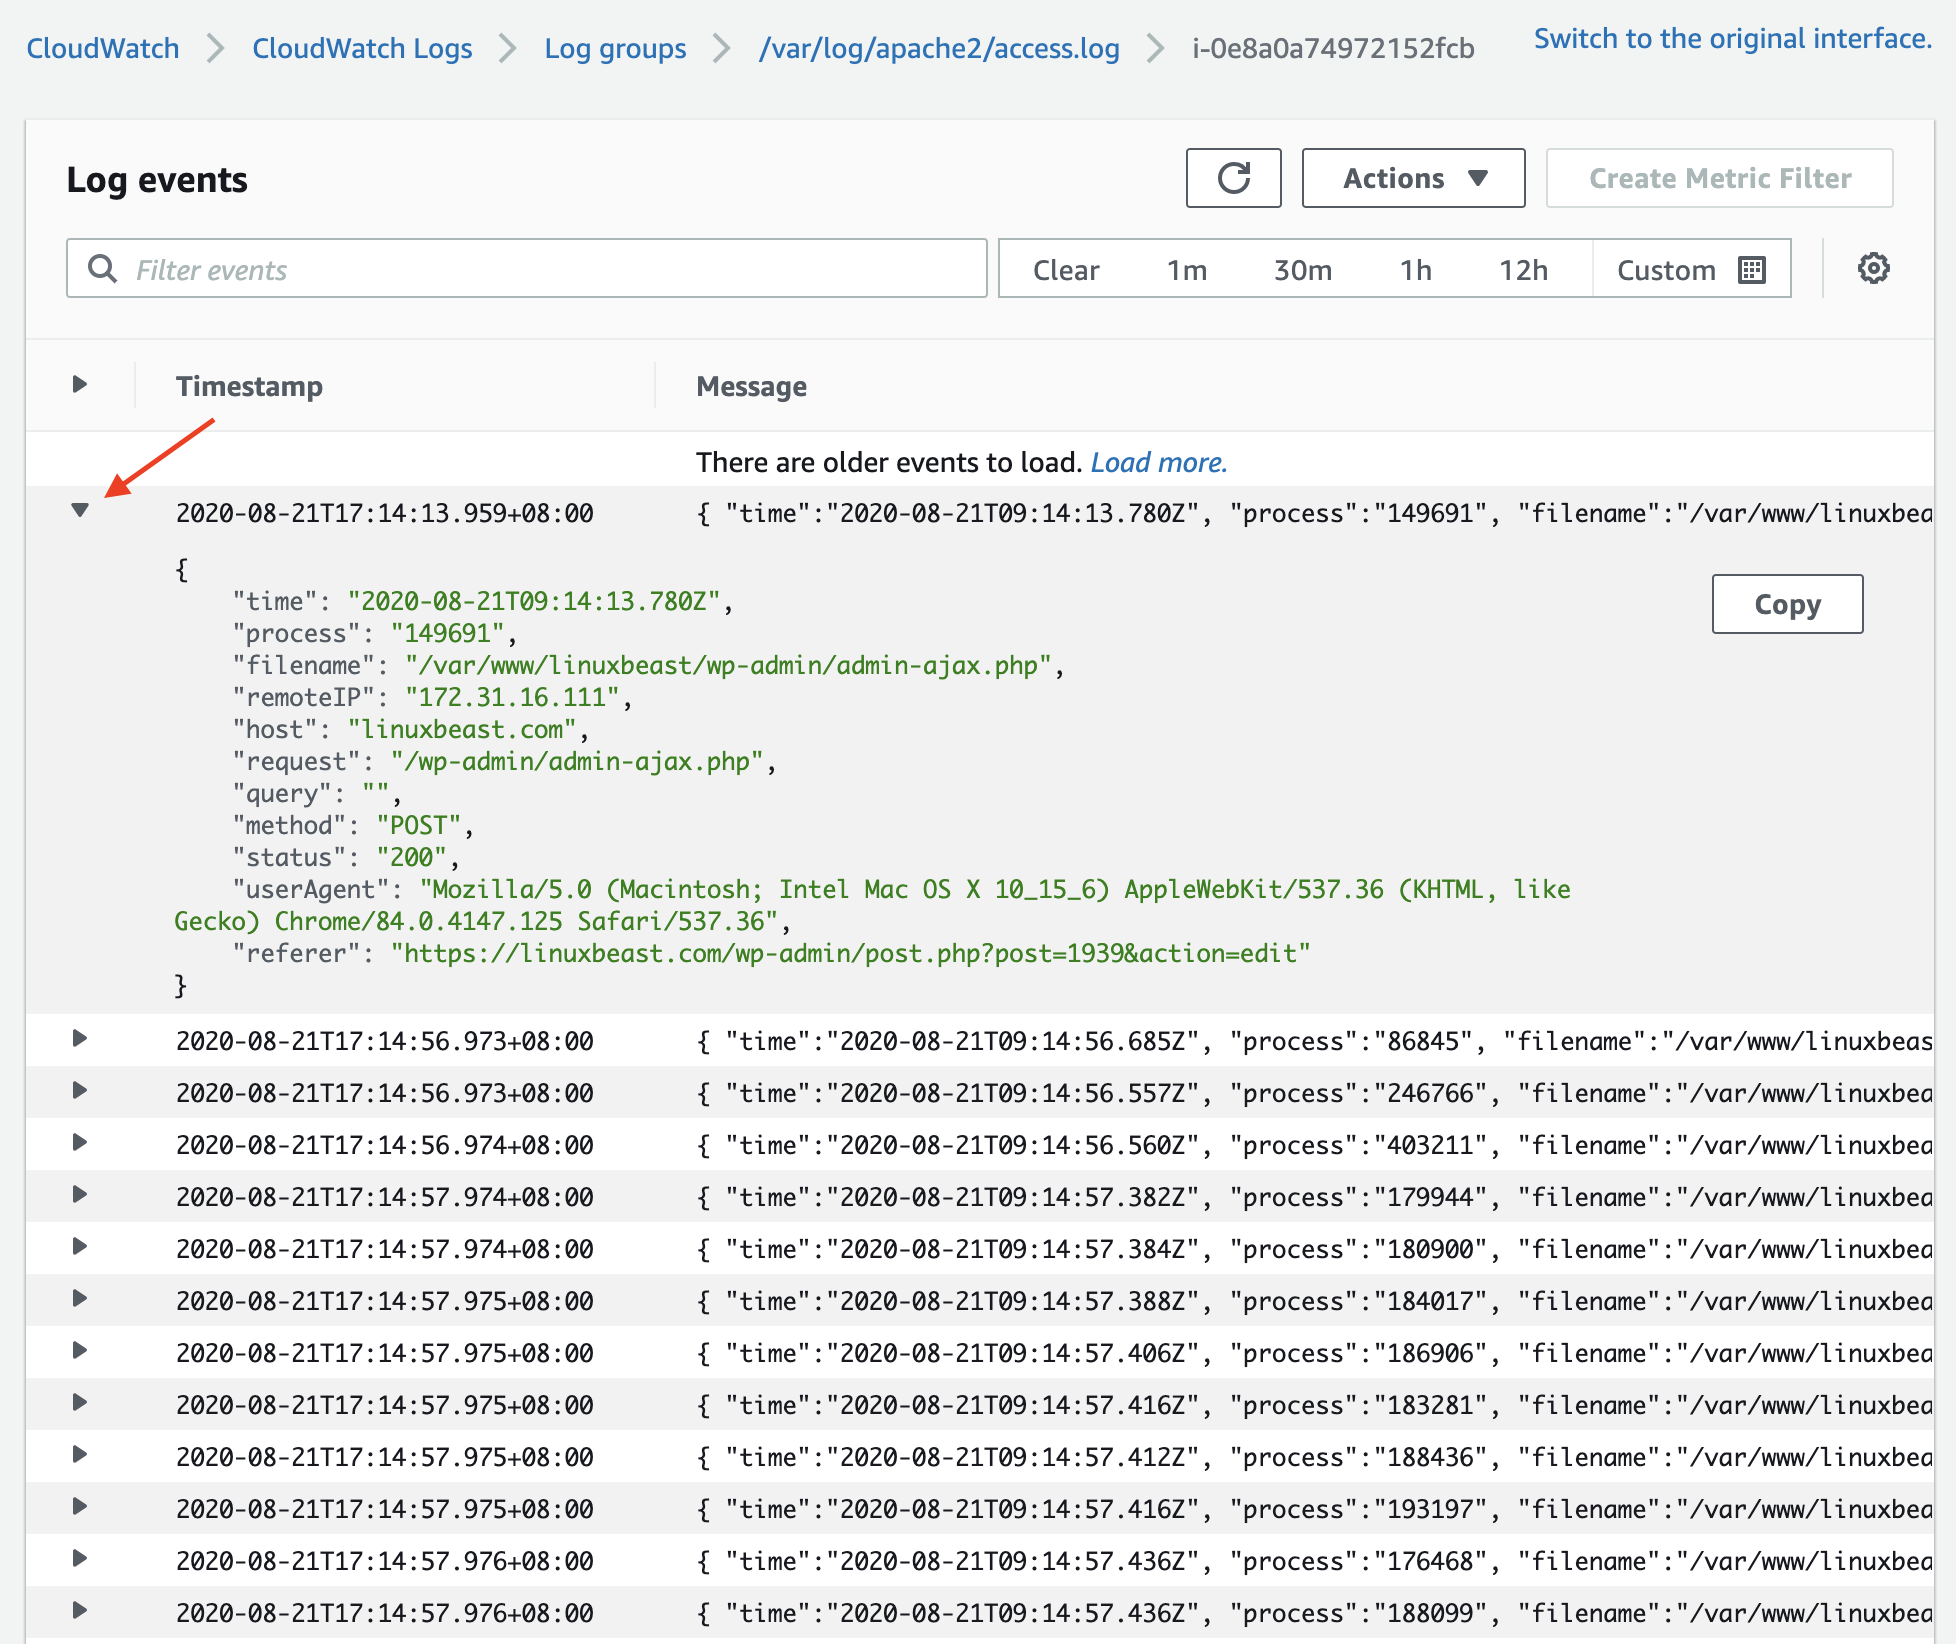
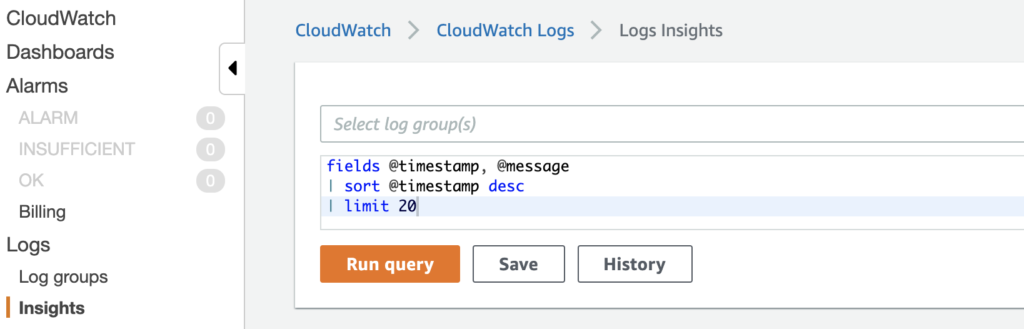
Open one of the log groups in CloudWatch Logs Insights. On the left navigation pane, under Logs, choose Insights.
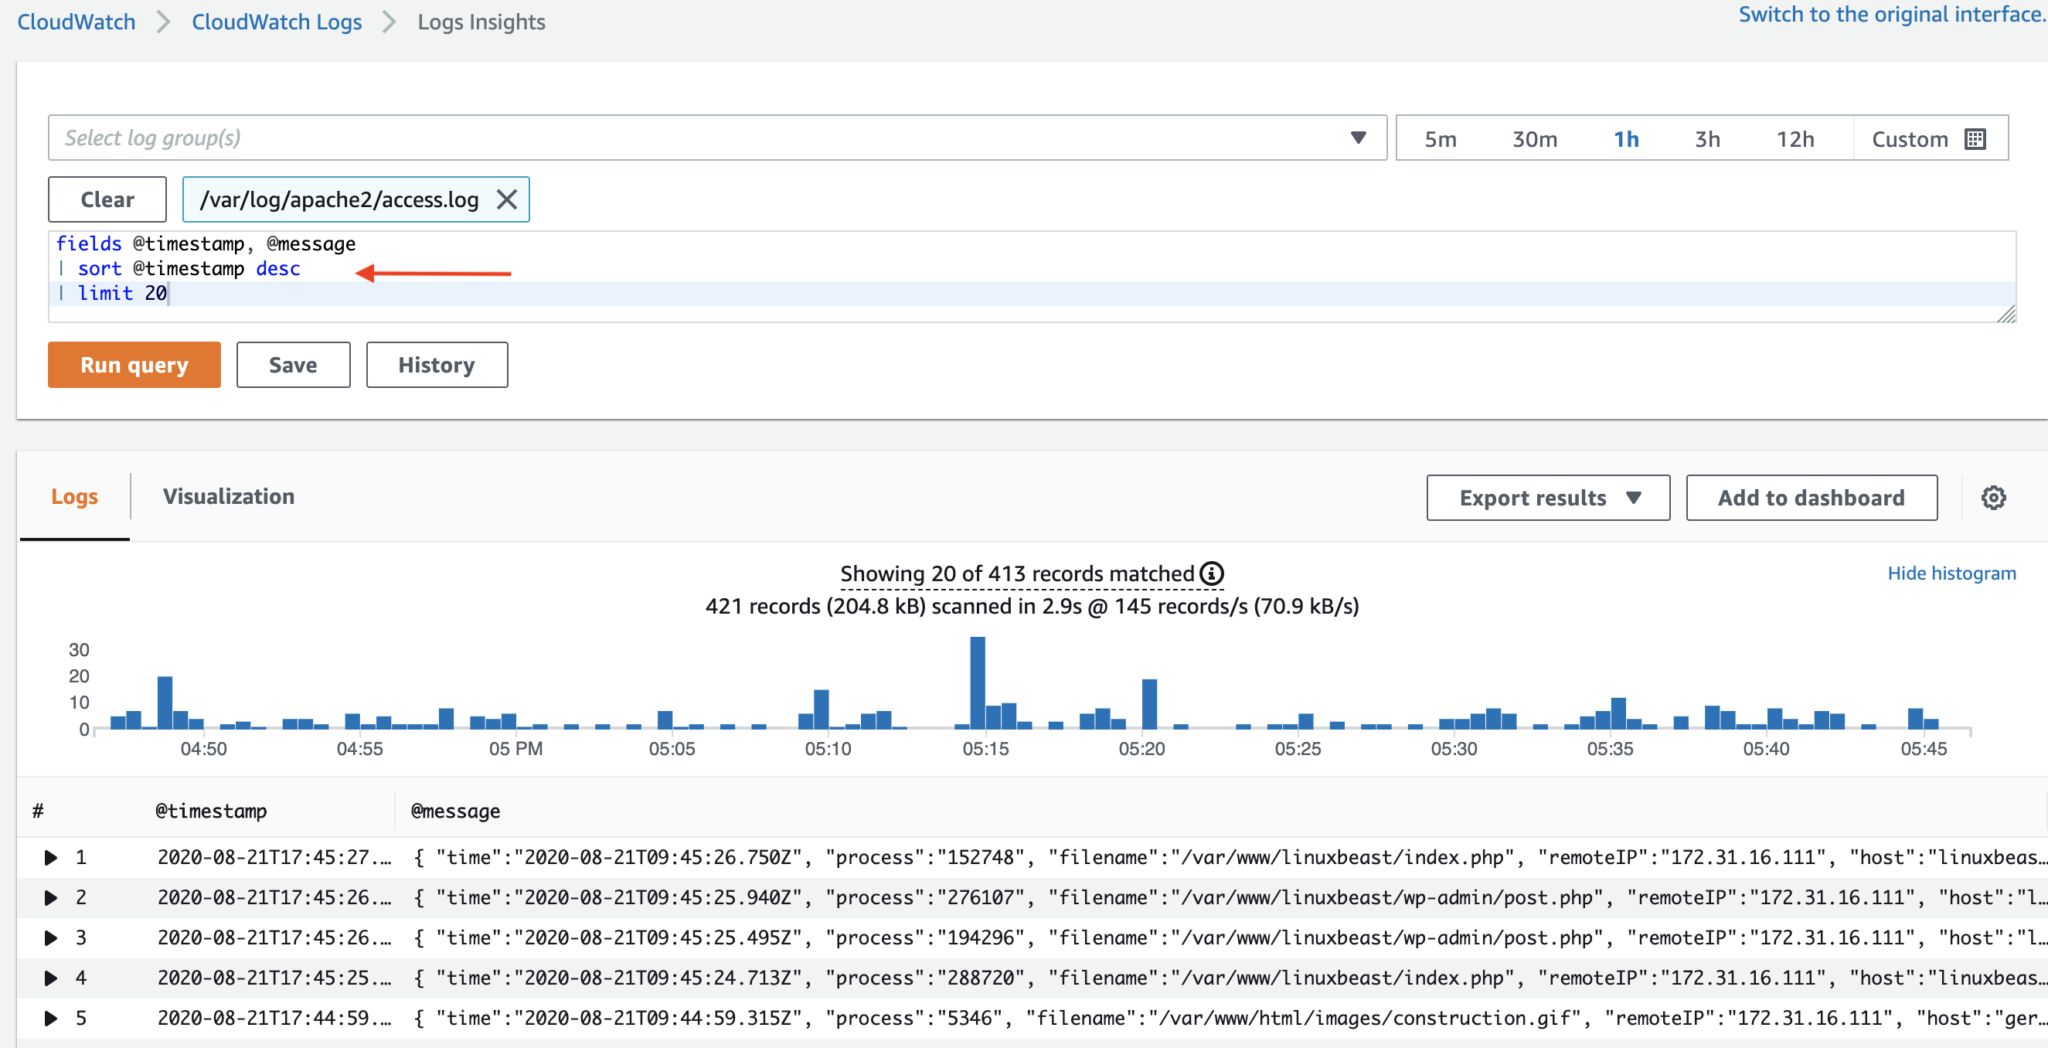
In the top search bar, select one of the Apache2 log groups.
Example: /var/log/apache2/access.log

Initially, you will see a default query on the screen and now click the Run query button.
You will see an output looks like this:
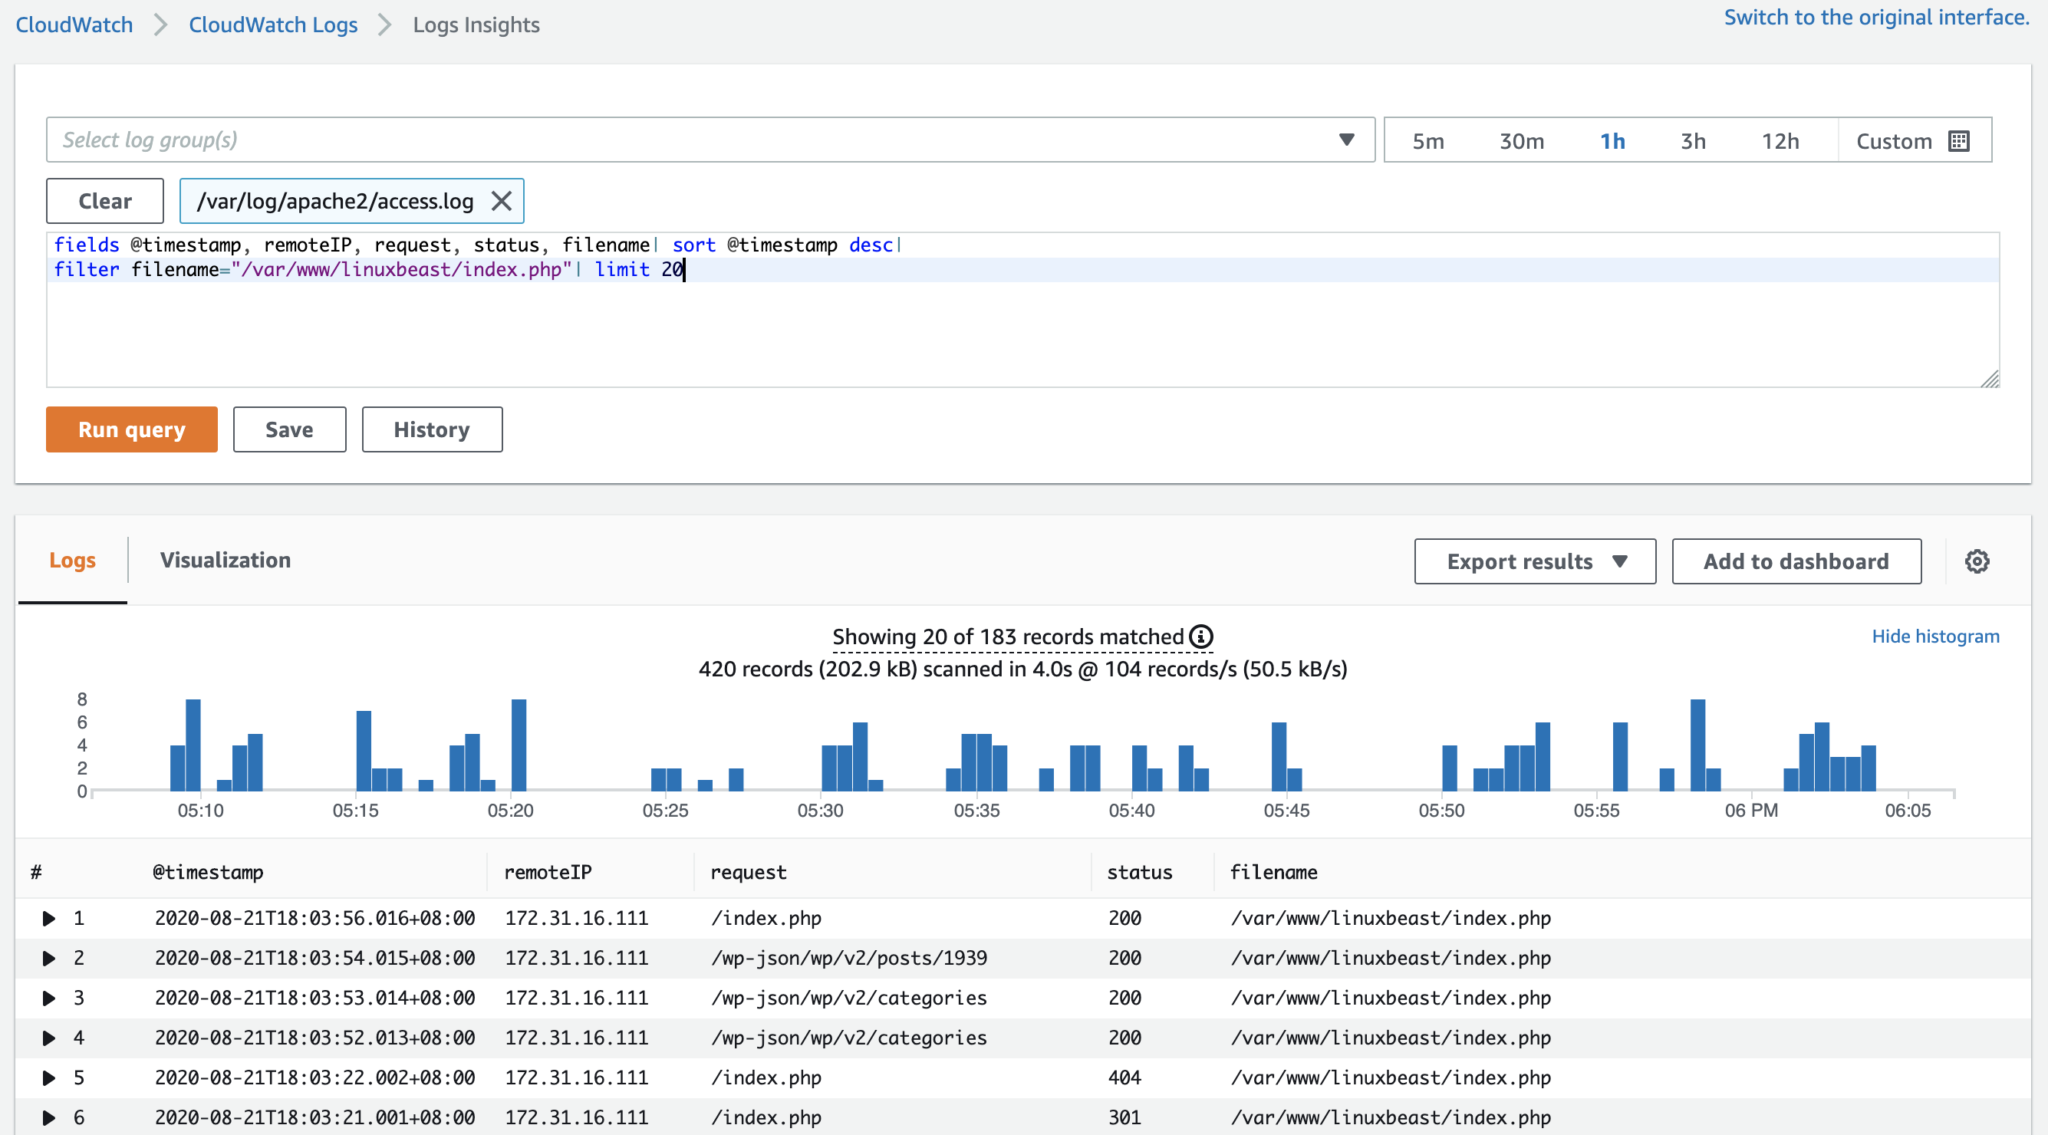
If you want to review your logs, checking the traffic for file /index.php path of your application. You can run query to call these fields looks like the following:
fields @timestamp, remoteIP, request, status, filename| sort @timestamp desc|
filter filename="/var/www/linuxbeast/index.php"| limit 20Copy
Output:
Common Investigation Query using Log Insight
Query to investigate, you can count how many requests each caller made.
fields @timestamp, remoteIP,request, status, filename| filter filename="/var/www/linuxbeast/index.php"|
stats count(remoteIP) as CallerIP by remoteIP|sort CallerIP desc| limit 10Copy
To check how many unique GET requests accessed your main page, with status “200” (success):
fields @timestamp, remoteIP, method, status|
filter status="200" and referrer\= http://172.31.16.111/ and method= "GET"|
stats count\_distinct(remoteIP) as UniqueVisits| limit 10Copy
To check which resource web scanning bots request most frequently:
fields status, request, method| filter status="404" or status\="403" and method\="GET"|
stats count(request) as Requested by request| sort Requested desc| limit 20Copy
You can change your log group to /var/log/apache2/error.log and do the same query as well.
To learn more CloudWatch Logs Insights Query Syntax, visit the guide below:
- https://docs.aws.amazon.com/AmazonCloudWatch/latest/logs/CWL_QuerySyntax.html
- https://aws.amazon.com/blogs/mt/simplifying-apache-server-logs-with-amazon-cloudwatch-logs-insights/
Note: With this guide you will also be able to setup your Nginx server logs.
Uninstall AWS CloudWatch Agent
To completely uninstall the AWS CloudWatch agent, stop the awslogs service type:
sudo service awslogs stopCopy
Then remove the following related files.
rm -rf /var/awslogs
rm -rf /etc/init.d/awslogs
rm -rf /home/ubuntu/awslogs-agent-setup.pyCopy
Delete also the log group from your AWS CloudWatch console so that it does not charge you a monthly fee.
I hope this tutorial helped you and feel free to comment section below for more suggestions.
Comments (0)
What are your thoughts on "How to Export Logs from Apache2 Web Server to Amazon CloudWatch"?
You need to create an account to comment on this post.
Related articles